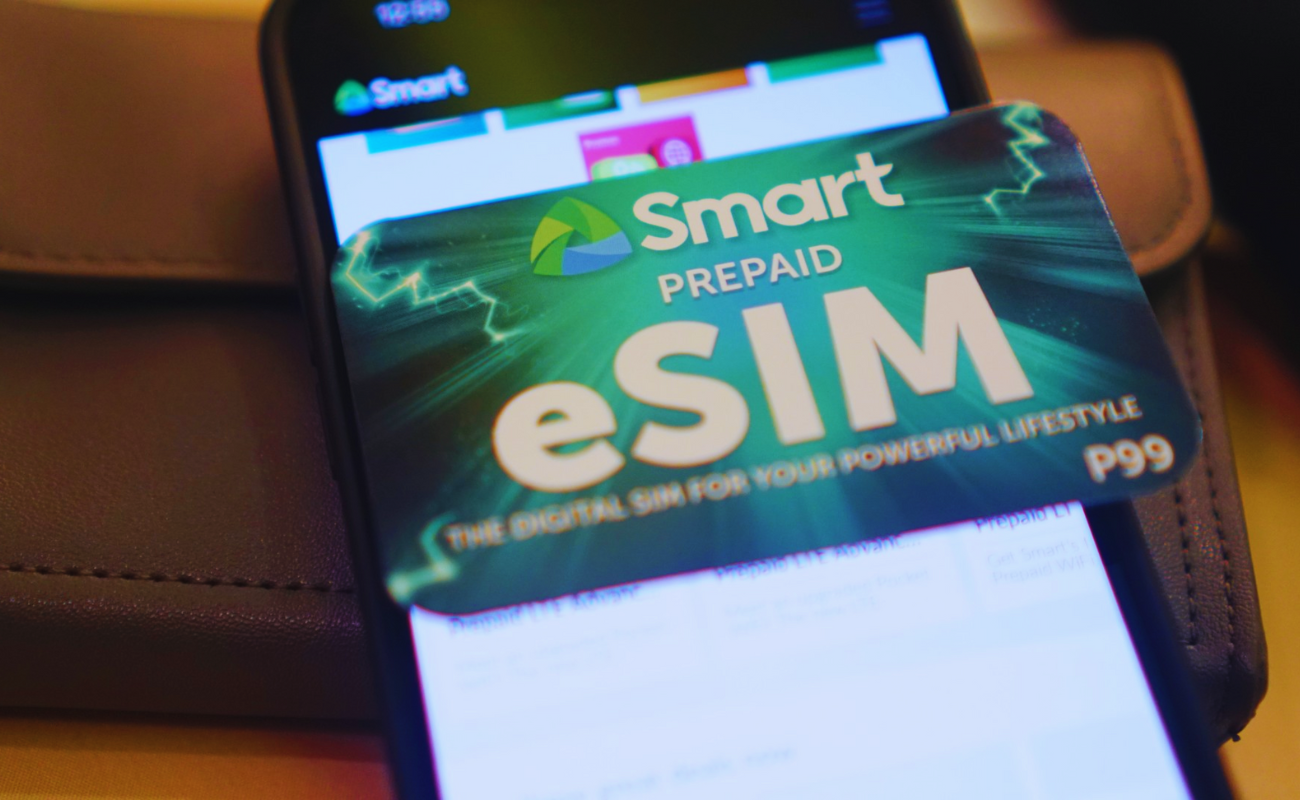
Thinking about trying an eSIM on your iPhone in the Philippines? You’re in the right place. An eSIM is a tiny digital SIM built into your phone that lets you have a mobile plan without a physical SIM card. In the Philippines, eSIMs are getting popular because they make it easy to switch carriers or add a new number without buying or swapping plastic SIM cards.
Whether you’re a student, an OFW, a traveler, or just curious, this guide is for first-time eSIM users. By the end of this article, you’ll know what an eSIM is, which iPhones work with it, how to buy and activate a prepaid eSIM, and how to set up calls, text, and data step by step. We’ll cover Globe, Smart, DITO, GCash, Maya, and other local telco options, making it easy and worry-free to get started.
What is an eSIM? (Beginner Explanation)
An eSIM (embedded SIM) is like a regular SIM card but in a digital form. Instead of inserting a tiny chip, you scan a QR code or enter details in your iPhone settings, and the network gets activated virtually. Here’s what you need to know about eSIMs:
- Physical SIM vs eSIM: A physical SIM is the small card you normally put inside your phone. An eSIM is built into the phone’s hardware. For you, it means no more fumbling with plastic cards. You can keep your main SIM in and activate a second number via eSIM, all from Settings.
- Advantages:
- Easy switching: You can switch between phone numbers or carriers without changing cards. Great for travel (get a local eSIM while keeping your home number).
- Dual SIM capability: Many iPhones let you use both a physical SIM and an eSIM at the same time. This means one iPhone can have two numbers (e.g., one for data and one for calls).
- No plastic waste: No need to get or lose a physical SIM. Activation is instant once you have the QR code.
- Disadvantages:
- Smartphone required: Your phone must support eSIM (most new iPhones do).
- Less hands-on: Some people prefer holding a SIM card. With eSIM, everything is done in software.
- Limited backup: If you reset your phone, you might need to re-add the eSIM by scanning again or contacting the telco. (Keep backup info safe.)
- Why Prepaid eSIM is Ideal: Prepaid plans are great for first-timers. You pay as you go, no contract, no big bills. You can load data or call promos on a prepaid eSIM just like a regular SIM. It’s low-risk: if you’re not happy, you simply stop loading it. Travelers and budget-conscious users especially like prepaid eSIMs. You can buy a small data load for a trip or use promos with no monthly fee.
iPhone Models Compatible With eSIM in the Philippines
Not all iPhones have eSIM, so let’s list which ones do. Most modern iPhones support it:
- iPhone XS, XS Max, and XR (2018) – These were the first iPhones with eSIM support.
- iPhone 11 Series (2019) – (iPhone 11, 11 Pro, 11 Pro Max)
- iPhone SE (2nd gen, 2020) – Even the SE model has eSIM.
- iPhone 12 Series (2020) – All models 12, 12 Mini, 12 Pro, 12 Pro Max.
- iPhone 13 Series (2021) – 13, 13 Mini, 13 Pro, 13 Pro Max.
- iPhone 14 Series (2022) – 14, 14 Plus, 14 Pro, 14 Pro Max. (On some models, US versions ship with eSIM only, but Philippine versions still accept a physical SIM too.)
- iPhone SE (3rd gen, 2022) and iPhone 15 Series (2023) – The latest models also support eSIM.
Important Notes:
- Dual SIM Support: All the above iPhones can handle dual SIMs: usually one physical SIM + one eSIM. Some newer models can even support two eSIMs at the same time (for example, if your phone has no physical SIM slot or if you want two digital lines).
- PH-purchased vs imported iPhones: If you bought your iPhone in the Philippines or an authorized Philippine store, it’s generally unlocked and works with any carrier’s eSIM. Imported iPhones should also work, but ensure they’re unlocked and not tied to another country’s network. Some US iPhone 14 models are eSIM-only (no physical SIM at all), so if you imported one, know that you can only use eSIMs. For most users, though, any recent iPhone works fine. If you’re unsure, check your iPhone’s model and carrier lock status before buying an eSIM.
What You Need Before Setting Up a Prepaid eSIM
Getting ready to activate your eSIM? Here’s what to prepare:
- A Compatible iPhone: Make sure you have one of the eSIM-capable iPhones listed above. Update it to the latest iOS version (at least iOS 16+ if possible) for the best experience.
- Internet Connection: You need Wi-Fi or mobile data on another SIM to download the eSIM plan. If this is your first line, connect to Wi-Fi so you can activate the eSIM without a current data connection.
- Apple ID: Make sure you’re signed into your Apple ID (Settings > [Your Name]). This isn’t strictly needed for eSIM, but it’s good practice for iCloud backup and for restoring eSIMs if you reset or get a new iPhone. Newer iPhones can even store your eSIM info in iCloud for restoration.
- Valid ID for SIM Registration: By law in the Philippines, all SIMs (including eSIMs) must be registered to your name using a valid ID (like a passport, driver’s license, UMID, PRC ID, or SSS). Have a clear photo or copy of your ID ready. If you’re buying in a store, the staff will help register it. If online, you may need to upload or take a photo of your ID. This step is mandatory, so don’t skip it.
- Telco Account/Apps (Optional): If you plan to manage your prepaid plan via phone, download the relevant app in advance. For example, Globe users can get the GlobeOne app, and Smart/TM users can download the Smart App (formerly GigaLife) or use GCash/Maya apps if buying their eSIM products. These apps let you buy load, check promos, and even switch a Globe physical SIM to eSIM.
- QR Code or Activation Info: Your telco will give you a QR code or some activation details. If you already purchased an eSIM online, you might have received an email with a QR code. If you’re in a store, they might show you a QR on a screen or give you a printout with a QR code and activation code. Keep this ready. If something goes wrong with scanning, you can enter the details manually into the iPhone.
Step-by-Step: How to Set Up Your First Prepaid eSIM on iPhone
Now the main event: adding your new prepaid eSIM to your iPhone. Here’s a detailed, step-by-step process. We’ll describe the general steps and note small differences for Globe, Smart/TM, DITO, and other providers.
- Get Your eSIM Code or QR Ready:
- If you’re buying in a store or kiosk, ask the staff for the eSIM activation QR code. They may register your SIM online and then show you a QR code or give you an envelope with a printout.
- If you bought online (for example, via a website or app), you’ll usually get an email or message with a QR code and some activation ID/password.
- Troubleshooting Tip: If you don’t have a QR for some reason, you can still activate manually by choosing “Enter Details Manually” on the iPhone (but try the QR first, it’s easier).
- Open iPhone Settings and go to Add Cellular Plan:
- On iOS 15 and earlier: Go to Settings > Cellular > Add Cellular Plan.On iOS 16 and later: Go to Settings > Cellular (or Mobile Data) and tap Add eSIM (or Add Cellular Plan).Your iPhone will open the camera viewfinder (if you choose QR) to scan a code.If you have the QR code on another screen or in an email, you can show it to the iPhone’s camera. If the code is printed, just point your camera at it.
- Scan the QR Code (or Enter Details):
- Scan: Position your phone so the QR code is fully visible on screen. The iPhone should recognize it and display the eSIM plan details (carrier name, plan name). Tap Add Cellular Plan or Add eSIM.
- Manual Entry: If using manual entry, type in the information from your telco: typically a long numeric SM-DP+ address, an activation code, and sometimes an optional confirmation code. Then tap Add Cellular Plan.
- After scanning or entering, your iPhone will download the eSIM profile from the network.
- Wait for Activation:
- Once added, your iPhone will show the new eSIM plan under Settings > Cellular. It may say “Activating” or show a spinning indicator.
- Give it a minute. Your carrier may send a message or automatically activate the line.
- Troubleshooting Tip: If it’s stuck on activating, try toggling Airplane Mode on and off. Also make sure you have an internet connection via Wi-Fi on the phone. If it still fails after 5–10 minutes, restart your phone and check again. For persistent issues, contact the telco’s support line (they can see if the plan was pushed to your device).
- Name (Label) Your eSIM Line:
- After activation, you’ll see options to label the new eSIM. The iPhone might offer suggestions like “Primary”, “Secondary”, or the carrier name (Globe, Smart, etc.).
- Choose a clear label that helps you remember (for example, “Globe Prepaid”, “Smart Load”, “DITO”, “GCash eSIM”). If prompted about “Cellular Plan Label” or “Label Cellular Plan”, tap Edit and type your preferred name.
- You can always change this later: go to Settings > Cellular, tap the plan name, and tap Label Cellular Plan to rename it.
- Set Your Default Line and Defaults:
- Go to Settings > Cellular > Cellular Plans or Mobile Data. If you have two plans (physical SIM + eSIM), you need to choose your default.
- Default Voice Line: Under Default Voice Line (or Default Line), select which SIM (number) you want to use by default for calls and SMS. You can pick Primary (usually your physical SIM’s name) or Secondary (the new eSIM name). If you plan to use the eSIM for calls, choose it here. Otherwise, leave it as your main SIM.
- Default Data Line: Tap Cellular Data and select which SIM provides mobile data by default. If you want to use your new eSIM’s data plan, choose the eSIM here. If you already have a separate data plan on your old SIM, decide which one to use.
- Voice & Data Settings: You can also specify if you want to allow Cellular Data Switching (iPhones give this option when using two SIMs). This means if your default line’s data is not available (e.g. no coverage), the phone can switch to the other line for data if you enable it. If you want total control, you can turn this off so the iPhone won’t hop lines automatically.
- Troubleshooting Tip: If you’re not getting mobile data on the eSIM after activation, check that Cellular Data is toggled On for that line (Settings > Cellular > Data Plan Name > Turn On This Line). Also, ensure the default data line is the one you expect.
- Test Your eSIM:
- Once activated and set as default (if needed), test it out. Turn off Wi-Fi and try to load a webpage or send an SMS. If you’re supposed to have mobile data, check that “LTE” or “5G” appears at the top next to the carrier name (Globe, SMART, DITO, etc.).
- You can also try calling a number to confirm voice works, or ask a friend to call you.
- Troubleshooting Tip: If there’s no signal (it says “No Service” or “Searching”), go to Settings > Cellular > Select Network and try manually choosing your carrier. For example, set it to Globe/TM, SMART, or DITO as needed. If it still fails, try restarting the phone or removing/re-adding the eSIM.
- Switching Between eSIM and Physical SIM:
- With dual SIM, you can decide which number to use for each task. For example, one number for data, another for calls or texts.
- To switch the data connection on the fly, go to Control Center (swipe down from top-right) and long-press on the cellular icon to choose which line to use for data.
- To send a message or place a call from a specific line, in the Messages or Phone app, you can tap a label above the dialer or chat box to switch the sender ID.
- Troubleshooting Tip: If your iPhone tries to use the wrong SIM (e.g. it tries using your old number even after selecting eSIM as default), check the Contact details for that person or Send & Receive settings (for iMessage) to ensure the right number is chosen.
That covers the setup process. Each major step above included quick tips if things go wrong. Now you should have your prepaid eSIM active on your iPhone!
How to Buy a Prepaid eSIM in the Philippines
Before setting up, you need to get a prepaid eSIM plan. Here are the main ways to do that with Philippine telcos:
- Globe/TM eSIM:
- GlobeOne App: You can convert your physical Globe SIM to eSIM or buy a new prepaid eSIM via the GlobeOne app (available on iPhone). In the app, go to SIM Services > Change SIM > Physical SIM to eSIM. Follow the steps, and the app will give you a QR code to scan.
- Globe Stores or Kiosks: Visit a Globe or TM store, bring your ID, and tell the staff you want a Globe Prepaid eSIM. They will register your SIM to your name (required by law) and hand you a QR code for activation.
- Online Purchase: Globe sometimes offers online purchase of eSIM via its website. You register and pay, then get the QR via email or in-app.
- Tip: After activation, manage your Globe plan in the GlobeOne app – it shows your remaining load and promos.
- Smart/TNT (TM) eSIM:
- Smart App (GigaLife): Smart’s app (the Smart App) can be used to buy or convert to eSIM. Similar to GlobeOne, it may offer an option under SIM services.
- Physical Store: Go to a Smart or TNT/TM store with your ID. Ask for a Smart Prepaid or TM Prepaid eSIM. They will generate the QR code on the spot.
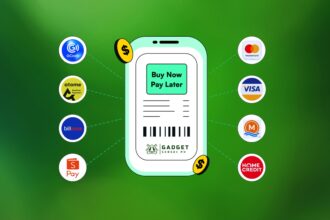
- GCash and Maya eSIM: GCash and Maya (formerly PayMaya) are e-wallet apps that also sell eSIM service plans (these run on Smart’s network). Download the GCash or Maya app, go to their SIM or Load section, and buy an eSIM data bundle. You’ll get a QR code from the app after eKYC. This is very convenient for travelers, since you can do it from home and even before arriving in the Philippines.
- Tip: Use the Smart App to load promos or check your balance. GCash/Maya users can also load or promos through those apps.
- DITO eSIM:
- DITO Stores/Kiosks: DITO Telecom offers a prepaid eSIM. Visit a DITO store or authorized dealer with your ID and ask for a DITO prepaid eSIM. They will register it and give you a QR code.
- Online (E-KYC): DITO’s website or DITO app may allow online purchase and eSIM delivery. You’d sign up, submit an ID photo, and receive the eSIM via email or SMS (check DITO’s current service portal).
- Tip: DITO’s prepaid eSIM often comes with an initial load and some free data. Check DITO’s promos online.
- Other eSIM Providers:
- Travel eSIMs: There are international eSIM providers (like Airalo, GigSky) that sell Philippine data eSIMs, useful for quick visits. But for local calls and texts, use Globe, Smart/TM, or DITO directly.
- Checklist: No matter which telco, expect to show a valid ID and fill a simple registration form (this is the SIM Registration Act requirement). Fill everything correctly – wrong name or missing ID will delay activation. The store or online system should guide you through eKYC (electronic KYC) if needed.
- Online vs In-Store:
- Online Purchase: Convenient if available. Make sure you have your ID ready for eKYC (taking a selfie with your ID). Delivery is usually a QR code via email. Advantage: you can do it from anywhere, even abroad.
- In-Store Purchase: You get help on the spot and immediate troubleshooting. Perfect if you’re unsure about tech or need assistance. You’ll leave with the QR code or eSIM already activated on your phone.
- Mistakes to Avoid: Don’t forget to register your SIM with your name and valid ID (a legal requirement). If buying online, use an official site or the telco’s official app to avoid scams. Keep your eSIM QR/code secure and don’t post it publicly (someone else could activate it). Ensure your iPhone is unlocked if it’s a second-hand device.
Setting Up Data, Calls, and Messages Correctly
Once your eSIM is activated, you want everything to work smoothly. Here’s how to make sure your data, calls, and messaging are set up right:
- Mobile Data Settings:
- Go to Settings > Cellular > [Your eSIM Plan Name]. Make sure Cellular Data is toggled ON for that plan if you want to use it.
- APN (Access Point Name): Usually, iPhones automatically configure this, but if you encounter no internet, you might need to enter an APN manually. Common APNs:
- Globe:
internet.globe.com.ph - Smart (TNT):
internet(orsmartbrofor data) - DITO:
ditomobile
(To check APN: Settings > Cellular > [Your eSIM] > Cellular Data Network, scroll to APN sections.)
- Globe:
- Data Roaming: If you’re on a local Philippine plan, you usually can turn Off Data Roaming to avoid charges when abroad. If you plan to use data while traveling, turn On roaming and get a roaming plan or use a global eSIM.
- Choosing a Data Line:
- If you have dual SIMs, decide which line carries the data by default (this was set in the previous section). You can change it at any time in Settings > Cellular > Cellular Data and pick eSIM or SIM.
- In Control Center: Press and hold the Wi-Fi/Signal widget, then tap Cellular Data. You can switch which number provides data on the fly. The iPhone will reconnect on the new line automatically.
- Messages and iMessage/FaceTime:
- Your iPhone can send texts (SMS/MMS) from either number. In Settings > Messages > Send & Receive, ensure both numbers are listed. The new eSIM number should appear with a checkmark. If it doesn’t show up yet, wait a few minutes or ensure your plan is active with text capability.
- In Settings > Messages > Start New Conversations From, choose which number to use as the default sender (you can pick either line).
- For FaceTime, go to Settings > FaceTime. Under You can be reached by FaceTime at, check both numbers if available. Choose a default line under Start New Conversations From as well. This way, video calls use the correct number ID.
- Troubleshooting Tip: If iMessage/FaceTime isn’t activating, make sure you have an internet connection (Wi-Fi or data) and wait a bit. You might see a prompt to verify your number. Follow it, or try toggling iMessage/FaceTime off and on again.
- Avoiding Accidental Charges:
- Cellular Data: Ensure only the line with a data plan has Cellular Data on. If your other line also has data on, your phone might use it unexpectedly. You can disable data on one line: go to Settings > Cellular, tap the other line, and turn off Cellular Data for that line.
- Data Roaming: Turn off roaming unless you need it. (In PH, some plans still roam on Smart’s network, etc., but it’s safer to off-roam if you only want local service.)
- Background Apps: Turn on Low Data Mode for a SIM line (in its settings) if you want to save data. This pauses background app updates on that line. You can also activate Wi-Fi Assist carefully – sometimes it switches to cellular if Wi-Fi is weak. Go to Settings > Cellular > Wi-Fi Assist and disable it if you want to avoid that.
- Promos and Expiry: Prepaid promos expire after a certain time or data limit. Keep track of your promo’s expiry (GlobeOne and Smart App both show validity). Use data during the promo period to avoid losing freebies.
Now your calls, texts, and data should flow correctly on your eSIM. Next, we address some common hiccups and how to fix them.
Common Problems and How to Fix Them
Even with a step-by-step guide, sometimes tech hiccups happen. Here are common eSIM issues in the Philippines and simple fixes:
- eSIM Not Activating / “No Service”:
- Restart your iPhone: The classic fix. Power off, wait 10 seconds, and turn it on. Often, the new eSIM will register on the network after reboot.
- Toggle Airplane Mode: Swipe to Control Center and tap the airplane icon on and then off. This resets the connections.
- Check SIM Line Settings: Go to Settings > Cellular. Make sure your eSIM line is turned on (Turn On This Line is toggled on). Also, ensure the proper carrier is selected.
- Manual Network Select: If automatic fails, go to Settings > Cellular > Network Selection and turn off Automatic. Let it scan, then choose your carrier (Globe/TM, SMART/TNT, or DITO).
- Try a Cellular Reset: Under Settings > General > Reset > Reset Network Settings. This clears saved networks (you’ll re-enter Wi-Fi passwords). Then try re-adding the eSIM.
- Contact Telco Support: If nothing works, contact your carrier. There may be an issue with activation on their end. They can push the profile again or resend a new eSIM.
- QR Code Already Used / Duplicate eSIM:
- If you see “Cellular Plan Not Used” or “This QR has already been used”, it means the eSIM code was already activated once. eSIM QR codes are usually one-time use.
- Solution: Ask the telco to reissue a new QR code or activation code. They can invalidate the old eSIM and give you a fresh one. This happens if you try to scan the same code on two phones, or if a previous attempt partially activated it.
- eSIM Missing After Reset or Restore:
- If you erase or restore your iPhone, the eSIM will typically be gone (since it’s just a profile). On iOS 16+, if you had iCloud backup and the eSIM-supported backup, it might restore automatically. But don’t rely on it.
- Solution: Have the original QR code saved somewhere (or activation info) to add it again. If you don’t, call the telco to reactivate the line. They may send a new QR. Always keep a copy of your eSIM details in a safe place (like a screenshot or email).
- “Network Not Supported” or “SIM Not Supported”:
- This can happen if your iPhone is carrier-locked or if the eSIM plan is not supported on your model. For example, if your iPhone was locked to another country’s carrier, it might reject a PH eSIM.
- Solution: Ensure your phone is unlocked (you may need to ask the seller or original carrier for the unlock code). If you have an American iPhone 14 (eSIM only) and try a non-US eSIM, check if that version supports eSIM abroad (most do, but some early reports noted issues with certain network bands).
- If using a carrier-locked iPhone (e.g., from abroad), you might have to use a physical SIM of your local carrier instead, or get it unlocked.
- No Data but Calls Work (or vice versa):
- If calls/SMS work but mobile data doesn’t (or the other way around), check your Cellular Data switch (as mentioned). Also, confirm you have data load available on the eSIM plan.
- If data is on, try toggling it off and on again. Go to Settings > Cellular > [Your eSIM] and toggle Cellular Data off, then on.
- Double-check APN settings (see previous section) if data still fails.
- If calls fail but data works, your phone might be set to use one line for calls. Change Default Voice Line in Settings > Cellular.
- eSIM Plan Shows No Balance / Invalid:
- This happens if the plan wasn’t properly activated or if you haven’t loaded it yet.
- Solution: Double-check that the eSIM shows the correct carrier name and “Active”. If it’s fresh, maybe it needs an initial load. Add load (via app or scratch card) and check again. You can dial the usual balance check code (*888# for Globe/TM, *121# for Smart/TNT, etc) and see if it responds.
- SMS/USSD Codes Not Working:
- If you can’t dial *123# or other short codes, ensure your eSIM is set as the default for SMS, or try dialing a full number with the same code (like 0917-888-1234 instead of *123#).
- Alternatively, use the carrier’s app (GlobeOne/Smart App) to check balances.
In general, most eSIM issues can be fixed with a restart, checking settings, or contacting the carrier. Don’t panic—telco customer service in the Philippines is used to helping with SIM activation issues.
Tips for First-Time Filipino eSIM Users
To make your first eSIM experience smooth and cost-effective, here are some extra tips tailored for Filipino users:
- Keep Your SIM Registration Handy: Under the SIM Registration Act, your eSIM must be registered to your name using a valid ID. Make sure your information (name, birthdate) matches your ID exactly, or the telco might block it. If you switch numbers, you’ll need to register the new one too. Save a copy of your registration details in your notes or email.
- Use Telco Apps for Promos: Download the GlobeOne app (for Globe/TM) and Smart App (or GCash/Maya) for Smart/TNT. These apps often have exclusive promos and data bundles for prepaid users. You can also reload (buy load) directly through these apps or through e-load services. This makes maintaining your prepaid eSIM plan easy. Some promos can give you extra data or extend validity if you load in specific ways (like GCash promos for Globe, or double load promos on Smart).
- Data-Saving Tips: Since you’re on prepaid, stretch your load by saving data. Use Wi-Fi whenever possible. Turn on Low Data Mode on your eSIM line (Settings > Cellular > [eSIM] > Low Data Mode) to reduce background data. Disable auto-update for apps over cellular (or set App Store > Automatic Downloads to Wi-Fi only). Use data-light apps if possible (e.g., the Lite version of Facebook, or browse with Opera Mini). Avoid streaming high-definition video on mobile data unless needed.
- Manage Dual SIM Smartly: If you keep a physical SIM and an eSIM active together (dual SIM), decide roles for each. For example, use one line for calls/SMS (maybe your old number) and the other line for mobile data (your new eSIM). In Settings, you can name lines like Personal and Data. If traveling, set the eSIM line for data (easier to top up and cheaper roaming) and the physical SIM off or vice versa. Remember that only one line can use mobile data at a time on many iPhones (unless you enable data switching).
- Backup Your eSIM Info: Write down or screenshot any activation codes or QR after you set it up, and keep it somewhere safe (like an email to yourself). That way, if you ever delete the eSIM by accident, you can re-add it without needing to contact the telco immediately. However, some carriers may require a new code anyway for security, so know your telco’s policy on reusing eSIMs.
- Switching Phones: If you get a new iPhone, you can transfer your eSIM using iCloud (on iOS 16+, go to Settings > Transfer or Reset iPhone > Transfer Cellular Plan) or simply re-scan the QR. Ensure your old iPhone doesn’t still have it activated once you move, to avoid confusion.
- Trust and Security: eSIMs are secure; they have the same encryption as physical SIMs. Just like a SIM PIN, you can set a PIN code on your eSIM (in Settings > Cellular > [Your eSIM] > SIM PIN) to prevent unauthorized use. Don’t share your QR code or any SIM details publicly.
- Travel Use-Case: If you often travel abroad (within or outside SEA), an eSIM makes it easy. You can buy a local eSIM online before your trip (e.g., Globe or Smart roam promos, or global travel eSIM from apps). Keep your PH eSIM as a second SIM for SMS verification or emergencies while roaming, then switch back to PH when home.
- Recharge Reminders: For prepaid plans, write down your expiration date after each promo or load. You can use calendar reminders on your phone so you don’t lose your number or leftover load.
By following these tips, you’ll save money and avoid headaches. The eSIM technology is there to make life easier once you get the hang of it!
eSIM vs Physical SIM in the Philippines (Comparison Table)
For clarity, here’s a quick comparison between using an eSIM and a traditional physical SIM in the Philippine context:
| Travelers, tech-savvy users, those needing multiple numbers (e.g., work and personal), or those who frequently switch providers. | eSIM | Physical SIM |
|---|---|---|
| Cost | Usually free to activate (no card purchase needed). You only pay for the load or plan. | SIM cards are often free or cost a small fee (like ₱30–₱50). You might need to buy a physical SIM kit. |
| Convenience | Change numbers/plans in settings without visiting a store. Ideal for switching carriers or adding a second number. No risk of losing a tiny SIM card. Great for travelers (buy local eSIM easily). | To switch carriers or numbers, you must swap SIM cards manually. Easy to handle and insert if you prefer a physical card. |
| Availability | Offered by major carriers (Globe, Smart/TM, DITO) and digital providers (GCash, Maya). Requires a compatible device. If supported, activation is quick. | Available everywhere, even small sari-sari stores sell SIM cards. Works with any phone that has a SIM slot (even basic phones). |
| Setup | Done via software (Settings app). Can often be done anywhere with internet, even abroad. | Requires inserting the SIM physically. After first setup, it’s automatic as long as the SIM is inside. |
| Flexibility | You can store multiple eSIM profiles on one iPhone (though active limit is usually two). Easily switch between profiles. | One SIM per slot. If you want multiple numbers, you need a dual-SIM phone with two slots, or swap manually. |
| Security | Similar to physical SIM; you can set a SIM PIN. Less chance of physical theft of a SIM card, but if you lose your phone, you’d need to reactivate the line anyway. | Physical SIM can be stolen or swapped in a lost phone scenario. You also need to keep track of the small card. |
| Ideal User Type | Travelers, tech-savvy users, those needing multiple numbers (e.g. work and personal), or those who frequently switch providers. | Users with older phones, those who prefer a tangible SIM, or in areas where eSIM support is still limited. Also good for people who don’t want to fuss with phone settings. |
Final Thoughts
Switching to an eSIM on your iPhone might seem tricky at first, but once you know the steps, it’s actually faster than fiddling with a physical SIM. In the Philippines, eSIMs open up a lot of possibilities: you can have multiple numbers on one phone, avoid losing SIM cards, and easily grab promo data bundles or travel plans.
Remember, the key steps are: get your QR code, scan it in Settings, name your line, and set your defaults. Keep your ID ready for registration, and use GlobeOne or Smart apps to manage your account effortlessly.
Don’t be afraid to try it! With this guide, you have all the info to set up your prepaid eSIM confidently. Soon, you’ll enjoy data, calls, and texts without the need for a tiny plastic SIM card. If you found this guide helpful, feel free to look up more iPhone tips and tricks. Happy connecting with your new eSIM!